
 Quarter cracks can be a serious issue, since when your horse’s hoof wall has a full crack; the sensitive lamina will become inflamed due to infection and trauma. This causes lameness as well as causes your horse to be in active. The good thing is this is mostly just a temporary problem.
Cause
The common cause of quarter crack is the constant excessive stress or force placed on a localized area of the hoof. Over time, the excessive load on hoof results to tearing of the lamina, bleeding and exudation in the sub-mural tissue, thus resulting to pressure that moves toward the coronet, building a disturbance of the coronary corium and resulting to coronary band defect. This leads to failure of new horn tubules at the coronet, resulting to hoof wall defect.
Identifying
The first step in the assessment of sheared heels is having a close look of the hoof and limb conformation while the horse is standing on a level surfaced ground. The gross alteration on the foot is proportional to the amount of continuous load experienced, the degree of structural damage as well as the duration of the condition.
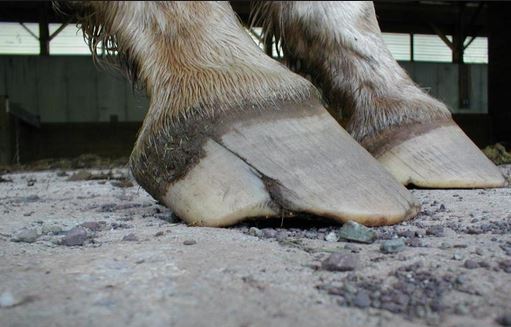
When sheared heels are in existence, the affected area’s heel bulb is displaced proximally when observed from the back of the horse. The front view of the horse will show he hoof wall on the affected area as straighter and in cases of chronic issues, it will begin roll below the foot.
A marked flare of the hoof wall is visible on the opposite side of the affected heel. When observed from the side, the coronary band is displaced proximally on the top side of the damage heel instead of having a steady uniform slope from the toe to the heel. The foot’s solar surface shows changes somewhere in the hoof capsule.
The foot is less symmetrical. The sole in the heel and quarter area will look wider on the side with the flare as well as narrower on the side with the sheared heel. It is essential to observe the front and rear of the horse while moving on a hard, level ground. This needs to be performed at a walk and a trot.
Viewing the rear of the horse while in motion will allow you to see which area of the foot is contacting the floor first and which area of the foot is acquiring the impact. The break-over’s direction should be noted when observed from the front.
Treatment
Any horse with a quarter crack needs to be monitored in while moving on a hard, level surface both before and after the trimming of the feet in order to assess the foot’s landing pattern. When the long-toe, club-foot conformation or underrun-heel conformation is present, it is important to start improving the foot conformation. Among the goals of this procedure are to construct more ground surface in the palmar area of the foot, especially on the side that is affected and to relocate break-over to the right position.
A full-thickness quarter crack is a fracture of the hoof wall and can be treated by performing an implant. When this crack is present, the repair should be delayed for few days following the hoof trim and shod.
Repair Methods
While many hoof cracks are minor, repairing one should be considered when the horse is lame, the crack is infected, or the damage is extensive enough that lameness is likely to result.
Prior to determining the repair method, Bill Moyer, DVM, professor and head of the Department of Large Animal Medicine and Surgery at Texas A&M University, recommends noting the type, location, and degree of involvement at the crack site. The costs involved, time, and horse’s job can also all impact the repair choice. Finally, it is very important that the vet and/or farrier have experience in the given technique because doing a poor job can do more harm than doing nothing at all.
Moyer also feels that the person holding the horse needs to be someone who can handle the animal appropriately, especially if the repair work is extensive.
Foot preparation is crucial to successful repair. The feet should be properly trimmed and balanced so that they strike the ground evenly. If poor landing pattern is not addressed, chances are the crack will keep breaking open. Then, every time it heals, it does so with more scar tissue.
After trimming, all dead or loose horn is removed. The crack is cleaned with a motorized burr or modified hoof knife and explored to determine the extent of damage and infection (if present) because that can have a significant impact on the chosen method. Any infection should be cleared up before attempting a repair.
There are many techniques and materials available to repair cracks, and no single technique will solve all problems. According to Moyer, the techniques currently being used for hoof crack repair include: “Remove hoof wall (make it non-weight-bearing below the crack); remove the offending wall and thus the crack; bum or rasp across the top of the defect; stabilize in one of a variety of means (nail across the crack, clamps of various designs, suture with various materials across the crack, patch the defect with various materials, placement of screws and wires to stabilize the crack); or apply shoes (a wide variety are used). There are also tapes and other methods I have failed to mention.”
The list of repair materials, he says, is equally as extensive and includes “various metals, rubber compounds, epoxies, polymethylmethacrylates, plastics, fiberglass, ‘space age’ fabrics such as Spectra and Kevlar, suture materials of various description and types, and so on.”
Moyer says “the goal of repair is to stabilize the crack, protect the damaged wall, eliminate pain and bleeding, and prevent further progression and possible infection.”
Often, it is necessary for the horse to continue to perform. In that case, Stephen O’Grady, DVM, MRCVS, who specializes in foot problems at Northern Virginia Equine in Marshall, Va., feels that the repair must provide strength and stability for performance, while also promoting healing. He recommends placing an implant (wires) along with an acrylic patch.
The simplest and least costly repair technique that Moyer suggests is fitting the horse with a bar shoe (usually an egg bar) with or without clips to anchor the shoe to the wall for more hoof stability, reduced work/rest, and time to grow out with an anticipated average growth rate of one-quarter-inch per month. This method is relatively inexpensive and is best for reasonably stable cracks that are not extensive.
Other materials used to increase stability are various fabrics and adhesives. Different types of fabric are used because some are appropriate for cracks with small amounts of lost hoof wall, while others are intended for high-stress repairs. Some of the earlier acrylics didn’t work well because they were too rigid and didn’t maintain a consistent bond long enough. Fortunately, the newer adhesives on the market are more reliable. When covering an infected crack, inserting a drain under the patch might be helpful, but it is best to allow the infection to heal prior to applying a patch, noted Moyer.
O’Grady suggests that to fix a toe crack, one first needs to correct the hoof capsule distortion through proper trimming. Once the hoof wall is corrected, the crack might stabilize on its own, but he stresses that no stabilization will work if the distortion isn’t addressed. If he chooses to repair a full thickness toe crack, O’Grady prefers a metal band with screws because the crack needs some kind of stability. However, he warns that the practitioner needs to be experienced to use these methods. Toe crack repair should be done with the foot off the ground so the crack is open to prevent pinching when weight is on the foot.